Learn to make this easy DIY lavender beeswax candle with a simple to follow recipe and step by step instructions!

This post contains affiliate links, which means I make a small commission at no extra cost to you. See full disclosure here.
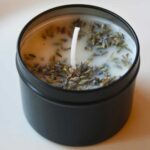
How to make lavender candles with fresh lavender
To use fresh or even dried lavender, you simply need to wait for the wax to cool slightly, add the essential oils for scent, and then quickly drop in your fresh or dried lavender.
Another way, would be to prep your container first by adding your fresh or dried lavender to the container in your desired way. Then pour the wax and once slightly cooled, add the essential oil for scent.
DIY Lavender candle recipe
This beeswax lavender candle recipe is very easy to follow! I first learned how to make homemade beeswax candles. Then, I modified that very basic recipe for the lavender candle.

Lavender Beeswax Candle Materials
6 4oz mason jars or 3 1/2 pint mason jars (or a container of your choosing)
6 Candle wicks
1 Large glass jar/bowl or metal pitcher
1 Large pot
6 Wooden Skewers, pencils, or candle wick holders
25-30 drops lavender essential oil
Lavender Beeswax Candle Ingredients
Beeswax
Coconut oil
lavender essential oil
DIY Lavender Candle Recipe
1 lb beeswax
1/2 cup coconut oil
25-30 drop lavender essential oil
Pin it for later!

How to make lavender beeswax candles
- Add beeswax to a large glass bowl or jar.
- Using a double boiler, on medium heat, stir occasionally until all the beeswax is melted. Be sure not to splash any water into the beeswax.
- After the beeswax has completely melted, add the coconut oil and remove from the heat.
- Glue a wick to the bottom of your candle jars and fill with melted wax and coconut oil mixture. Leave about an inch of room at the top of the jar
- Add in 25-30 drops of lavender essential oil
- If you’re using a pencil, or wooden skewer, wrap the other end of the wick around it and lay it horizontally across the top of the jar to keep the wick centered during the hardening process.
- Once the wax is completely hardened, trim the wick (should be about half an inch long) and your candle is ready to light!

Tips for the best lavender beeswax candles
- I suggest choosing one that you can designate for beeswax projects. It is almost impossible to get beeswax out of dishes. Another option is a metal pitcher or old coffee tin so you can throw it away afterwards if you please.
- It may take 24-48 hours for your candles to fully harden. Make sure it is fully hardened before lighting to get the longest burn time
- If the candlewick sparks or smokes when you go to light your lavender candle for the first time, just blow it out and re-cut your wick.
- If you cut your wick too much shorter than 1/2 inch, the candle will burn in a tunnel shape.
- Be sure to add your lavender oil once the wax has cooled to around 125 degrees. (you’ll know because it begins to change color)
- Beeswax should not be burned for short periods of time to prevent tunneling altogether. It may take 2-4 hours of burning for the wax to melt to the edge of the jar. This will encourage a more even burn.
Lavender Beeswax Candles
Equipment
- 6 4oz mason jars or 3 1/2 pint mason jars or container of choice
- 6 Candle wicks
- 1 Large glass jar/bowl or metal pitcher
- 1 Large pot
- 6 wooden skewers, pencils, or candle wick holders
- 25-30 drops lavender essential oil
Materials
- 1 Pound beeswax
- 1/2 cup Coconut oil
- 25-30 drops lavender essential oil
Instructions
- Add beeswax to a large glass bowl or jar.
- Using a double boiler, on medium heat, stir occasionally until all the beeswax is melted. Be sure not to splash any water into the beeswax.
- After the beeswax has completely melted, add the coconut oil and remove from the heat.
- Glue a wick to the bottom of your candle jars and fill with melted wax and coconut oil mixture. Leave about an inch of room at the top of the jar
- Add in 25-30 drops of lavender essential oil
- If you’re using a pencil, or wooden skewer, wrap the other end of the wick around it and lay it horizontally across the top of the jar to keep the wick centered during the hardening process.
- Once the wax is completely hardened, trim the wick (should be about half an inch long) and your candle is ready to light!
Notes
More posts you’ll love:
How to make beeswax candles
20 pros and cons of beeswax candles
Top 7 benefits of beeswax candles
Why add coconut oil to beeswax candles
Does this candle put off much scent? Like will it scent a room? A bathroom?
I’d like to make, thanks
Honestly, yes! Ive noticed that when I use essential oils in my candles, the best way to ensure they truly scent a room is to keep it covered after its done. So if using a mason jar, make your candle and keep covered. Once you light it (make sure that initial burn burns all the way to the edge of the jar) blow out the candle and place the lid back on. The repeat this care for ever use and it should put off enough scent!